You might have recently setup your Raspberry Pi or your Linux box as a 24 x 7 torrent downloader, or a small Web server to host your own website. And just then you realize that your ADSL or Cable Internet connection has a dynamic IP address which changes frequently and every time you reconnect. Thus, it becomes hard to access your box with a fixed Domain name or IP address.
To solve this problem you can setup a Dynamic DNS which will update your IP to a DNS name everytime it changes and you can access you hosted website, or ssh into it to monitor torrent downloads with ease.
While there are many paid dynamic dns service providers available, but here you will see one way to do it for **FREE** [Thanks to freedns.afraid.org]
Step 1
Register for a Free domain at http://freedns.afraid.org/signup/
[We will take techhome.homenet.org in this guide]
Step 2
Logon to FreeDNS (where you just registered) and gotohttp://freedns.afraid.org/dynamic/
Or, simply click on "Dynamic DNS" link from the left navigation menu

Right click on "Direct URL" and copy the URL and paste it somewhere.
Register for a Free domain at http://freedns.afraid.org/signup/
[We will take techhome.homenet.org in this guide]
Step 2
Logon to FreeDNS (where you just registered) and gotohttp://freedns.afraid.org/dynamic/
Or, simply click on "Dynamic DNS" link from the left navigation menu
Right click on "Direct URL" and copy the URL and paste it somewhere.
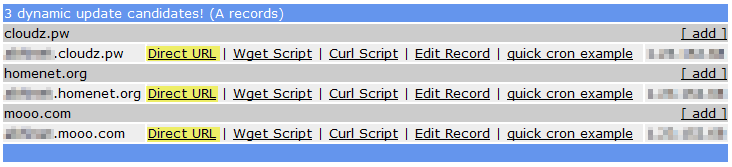
You should notice a large and unique alpha-numeric key in the URL, make a note of it as shown below:
http://freedns.afraid.org/dynamic/update.php?[alpha-numeric-key]
for example (akhdjfgashdiqyetrakhjsdf==)
Step 3
Either log on to raspberry pi desktop using LXTerminal or ssh into your raspberry pi from your computer.
On mac open terminal, type
ssh "username"@ip address
where username is what you setup pi with and ip address is that of your pi
eg. ssh pi@192.168.1.132
it will ask you for permission the first time and password that you setup your pi with
Step 4Install inadyn using the following command:
sudo apt-get install inadyn
Step5
Configure inadyn using the below steps:
And add the following contains in it replacing the actual values: (mine was blank so your can copy and paste what is below and change the things in red. Username and password are what you used to sign up for freedns)
sudo apt-get install inadyn
Step5
Configure inadyn using the below steps:
sudo nano /etc/inadyn.conf
And add the following contains in it replacing the actual values: (mine was blank so your can copy and paste what is below and change the things in red. Username and password are what you used to sign up for freedns)
--username techhome
--password mypassword
--update_period 3600
--forced_update_period 14400
--alias techhome.homenet.org,alphanumeric key
--background
--dyndns_system default@freedns.afraid.org
--syslog
Step 6
Now, we need to ensure that the DNS updater (Inadyn) runs automatically after every re-boot
export EDITOR=gedit && sudo crontab -e
Add the following line below all the text:
@reboot /usr/sbin/inadyn
Step 7
Reboot system and then run the following command to ensure inadyn is running:
DONE
Now your host is ready and up for accessing from internet...
You can trying ssh-ing from another computer over the internet
ssh username@techhome.homenet.org
Or, if any web server is running, then simply browse to http://techhome.homenet.org
Or, you can just ping it to test ping techhome.homenet.org
To check the logs you can use this:
more /var/log/messages |grep INADYN
This has been re-tested to be working perfectly with inadyn 1.96.2-1 on Raspbian 3.12.22+