I purchased a new 27" imac in July for home desktop computer to store family photos as well as edit gopro videos. I decided on the 27" version because of the ability to upgrade ram for cheap on my own to 16GB as well as the speed bump from 5400rpm to 7200rpm on the internal 1TB drive. I have been using SSD for a long time now (custom built hackintosh and macbook pro) and I simply couldn't go back as it was soo slow.
To counteract I decided to purchase a thunderbolt external with SSD to act as the boot drive and use internal 1TB drive for data storage. To accomplish that I purchased this drive from Akito on amazon. At the time I got it for $179.99 (it has since gone up to $249.99). Note: You can also get it in 256GB here for $325 or 512GB here for $570.
In order to boot from the drive you must first backup your HDD to the Akitio and then move home folder to internal data drive. Since boot drive is only 120GB, I did not have enough room to backup so I decided to do a clean install from scratch. Just download Maverick 10.9 from App Store and install. When prompted select to install on your connected thunderbolt drive. When that is finished you need to create account that you won't use, but I recommend creating backup account with admin privaleges in case anything goes wrong.
Now open up system preferences and find Startup Disk. Choose your new thunderbolt drive that has OSX installed and click restart.
When computer restarts you should have fresh copy of OSX. Now to add home folder open up System Preferences again. This time select Users & Groups.
Click on the lock in the bottom left hand corner and enter your password.
Right click on your user account and select Advanced Options...
Now click on the Choose... button next to Home directory:
Find your user folder on your internal drive (Macintosh HD/Users/xxxxxx). It will ask you to restart computer. Now when it boots back up you should be booting OSX from thunderbolt drive and storing all your data on your internal 1TB drive.
Notice that boot time will reduce dramatically and that your data (photos/etc) will still be slow when scrolling in iphoto.
I was getting around 120MB/s in Blackmagic disk test for write and around 400MB/s read which is a very big jump.
I had one problem and that was the thunderbolt drive got very very hot to the touch and worries me about the longterm longevity of the internal SSD. I paired with cheap laptop USB cooler and this helped keep the temps down.
I ran this setup for a few months. I ran into 2 issues. The first is a known problem with apply and their engineers still haven't gotten back to me why you can't use headphone port when booting from external thunderbolt drive, osx simply won't recognize it. The second was the random sleep issues of drive not going to sleep so I had to uncheck wake for network access and powernap.
I did some research and ended up deciding to make the jump to replacing internal HDD with SSD and get rid of the external thunderbolt. I have read that if professionally done it does not void warranty. I talked to apple and they would not let me pay to have them do it and verified that it voids warranty no matter what if you open it up. I repeat, it doesnt just drop warranty of the drive but you lose complete warranty of imac so proceed at your own risk.
First I needed to buy the right equipment to make the switch.
- 2.5 to 3.5" converting drive bay - I picked up this drive bay from Amazon here as the reviews said it worked for them on this build. You need a full length drive bay in order for it to mount properly inside
- iFixit kit in order to remove screen from iMac. Be sure to get correct one. Click this link and select buy these tools (see picture below). This will give you everything
- replacement adhesive strips
- Plastic Cards
- Spudger
- T10 and T9 Torx screwdriver
Note: I had set of torx scredrivers so I did not buy those. I also want to point out that I had T8 and not a T9 and it worked just fine for HDD part.
Next I need to backup my stuff to new SSD. I had USB 3.0 enclosure and plugged into imac. I use carbon copy cloner to clone the boot drive and my user folder to combine them.
Then follow the guide from ifixit on page I linked above or click here to replace the drive
After it was done I booted it up and now I have 1TB internal SSD that is really really fast. I got over 500MB/s read and write with blackmagic disk speed test.
DONE
EditStep 1 — Display
Starting on the left of the display, near the power button, insert the iMac Opening Tool into the gap between the glass panel and the rear case.
The hub on the iMac Opening Tool will keep you from pushing the wheel in too far. If using a different tool, insert no more than 3/8" into the display. You risk severing antenna cables and causing serious damage.
Use the tool like a pizza cutter—roll it along through the gap, and it will cut the foam adhesive through the center.
Be sure to always push with the handle behind the cutting wheel. If you pull, the wheel might get pulled out of the handle.
Run the tool up along the left side of the display.
Continue along the top of the display.
You may want to run the tool back and forth through what you've already cut a few times, to ensure you get as much of the adhesive separated as possible.
Finish pushing the opening tool to the bottom of the right side of the display.
At this point, you'll want to run the tool back around the entire display, to ensure you cut as much adhesive as possible.
While the opening tool did the lion's share of the work, the display will still be slightly adhered to the case. A plastic card will be necessary to free up the last of this adhesive.
Set the iMac face-up on a table.
Starting from the top right corner of the iMac, insert a plastic card between the display and frame.
Slide the card toward the center of the display, to cut any remaining adhesive.
Be sure to stop before the iSight camera, or you may damage it.
Gently twist the card, slightly increasing the space between the display and frame.
As with the other side, move slowly to allow the adhesive to break, and be careful not to over-stress the display glass.
With the cards inserted as shown near the corners, gently twist the cards to increase the gap between display and case.
If there are any sections that seem to stick and won't separate, stop twisting and use one of the cards to cut the adhesive in the problem area.
Begin to lift the top of the display up from the frame.
Only lift the display a few inches—it is still attached to the iMac by data and power cables.
Lift the display up to a near-vertical position.
At this point there is still a strip of adhesive along the bottom of the display, that will hold the display to the frame like a hinge. You can loosen this adhesive by working the display up and down a few times.
Lift the display up from the frame and remove it from the iMac.
It may be necessary to slowly lift from one side, to peel against the remaining adhesive.
Be very careful handling the display—it's big, heavy, and made of glass.
With the hinge free to move, the iMac will be unbalanced and hard to work on. Repairs can be completed as shown, but are faster and easier with an
iMac service wedge.
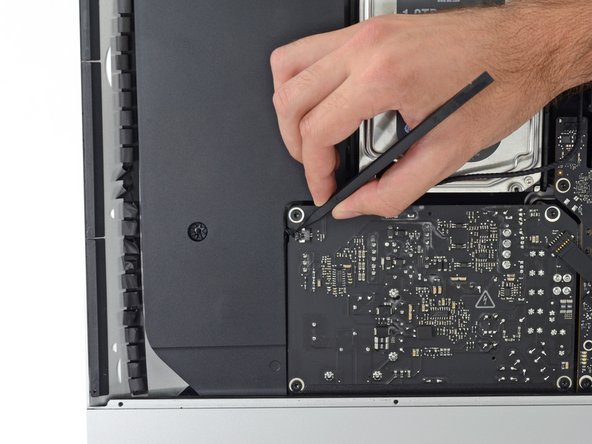
EditStep 24 — Left Speaker
Use a spudger to disconnect the power button connector from its socket on the logic board.
Be careful not to touch any solder joints on the back of the power supply. Capacitors may be charged enough to give you a dangerous shock.
Grab the hard drive and left hard drive bracket together.
Tilt the left side up away from the rear case, and slide the assembly to the left.
Remove the hard drive and left hard drive bracket from the iMac.
EditStep 34 — Hard Drive Replacement